Showing posts with label Canning and Preserving. Show all posts

Tuesday, November 21, 2017

Cranberry Relish


Every family has one or two recipes that come out during the holidays that are fairly unique to their family.  My family has Cranberry Relish.

It's not a pickled relish as you might expect from a hot dog relish.  It's all fruit, made with fresh cranberries, a whole orange, a whole apple, and just enough sugar to take the puckery edge off a bit.

Over the years, this has become my favorite condiment for that after-Thanksgiving turkey and stuffing sandwich.  I'll gladly pass the jellied stuff for a big heaping spoonful of cranberry relish.

Enjoy the recipe below.  Happy Thanksgiving!

Cranberry Relish

Ocean Spray actually sold a similar product in a tub in the refrigerator section of the grocery store back in the 80's or 90's.  It came in various additional flavors, such as cran-raspberry, but the texture and taste was nearly the same.  I'm not sure what ever happened to them.

1 12oz package fresh or frozen cranberries
1 large range, preferably a thin-skinned variety
1 whole apple, preferably a less-tart variety
1/2 to 1 cup of granulated sugar to taste

  1. Wash the apple and remove the core and seeds.  Chop the rest of the apple, skin and all, into large chunks.
  2. Wash the orange and slice-off the stem and blossom end so that you can see the orange flesh.  If using a thick-skinned variety, such as a navel orange optionally remove half of the peel (the thick white pith is the most bitter part).  Chop the remainder of the orange into large chunks, removing any seeds as best as you can.
  3. Wash cranberries if using fresh.
  4. Place the apple and orange chunks into the bowl of a food processor outfitted with a steel blade.  Process in pulses until the fruit is very finely chopped, almost pureed.
  5. Add the cranberries.  Pulse just until the mixture is the texture of hot dog relish.
  6. Remove mixture to a bowl.  Stir-in 1/2 cup of sugar.  Taste and add additional sugar until you like it.  Keep in mind that the mixture will sweeten slightly as it sits, so you may wish to under-sweeten it and add more sugar the next day.
  7. Pack into an airtight container and refrigerate up to 3 days.  Serve.
Optional Canning Instructions
This product is made of high-acid ingredients and thus is safe to can.  The instructions provided below were devised by reviewing recipes for pickle relish and making some adjustments to buy a little extra safety.
  1. If the relish seems dry, add about 1/2 cup of water or commercial orange juice to loosen it up.  This will keep the density down for safety.  You might also wish to allow the mixture to macerate overnight in the refrigerator, which usually extracts juices naturally from the fruit and softens it.
  2. In a large pot, heat the mixture just until it is heated through and is at a simmer.  Remove from the heat.
  3. Pack into jars no larger than quarts.  Leave 1/2 inch head space.  De-bubble as best as you can, wipe the rims, and add lids and rings.
  4. Process in a boiling water bath for 15 minutes.

Friday, October 27, 2017

Pickled Swiss Chard

Pickled Swiss Chard

I like Swiss Chard.  It grows really well in my garden, has a mild flavor as greens go, and can be substituted for spinach, kale, and other hearty greens in soups, stews, frittatas...you name it.  Plus, it has a long growing season.  In fact, we've had a frost or two and it's still chugging away in my garden like it's nobody's business.

Unfortunately, this year we ended-up with too much.  I planted about 8 plants plus we joined a CSA, so I was receiving bunches of it from the farm each week.  We've also had a busy summer where I wasn't home cooking as much, so I really couldn't keep up with it.  I had to find a way to preserve it.

When it comes to greens, the easiest and most common way to preserve them is to blanch them in boiling water, drain, then freeze.  However, I find they get mushy and lose the fresh flavor that I love, so I was looking for something a little different.  I considered pressure canning them, but I figured that'd have much the same problem, plus they'd get kind of gray-ish.  Then, a thought hit me.

In my family, we've always eaten brassicas and greens (broccoli, spinach, cabbage, etc.) with a dash of vinegar.  I don't know where it started, but my Dad always did it and so I picked-up the habit.  It's a great way to give them a little pick-me-up flavor without drowning them in sauce or seasoning.  So why not pickle my chard?

I tried a single jar and it came out awesome.  So here's the recipe for you today.


Pickled Swiss Chard


For the Brine:
2 cups cider vinegar
2 cups water
1-2 tablespoons sugar (to taste)

1 teaspoon of pickling salt per jar
As much Swiss Chard as you like

  1. Wash chard leaves thoroughly.  Strip the rib out of the center and chop it into half-inch pieces.  Chop the chard into 1 to 2 inch squares.
  2.  Bring a pot of water to a boil.  Working in batches, blanch the chard and stems in the water until the greens wilt slightly.  Remove into a colander and run under cold water to stop the cooking and set the color.
  3. Prepare brine by bringing ingredients to a simmer until the sugar is dissolved and liquid is hot.
  4. Pack washed pint jars with 1 teaspoon of salt each and blanched chard, packing it full but not so tightly that it is compacted.  Leave 1 inch of head space.
  5. Pour brine over chard in jars leaving 1 inch of head space.  De-bubble as necessary.  Make additional batches of brine as needed to fill jars.
  6. Place lids and rings on jars.  Process in a boiling water bath for 10 minutes.
Pickled Swiss Chard (in a Purple Jar)

Why is it Safe?
A 50/50 vinegar/water brine recipe is typical for most vegetable pickles and according to the NCHFP, sugar and spices can be modified at will in a pickle recipe (sugar is not acting as a preservative).  This particular recipe was adapted from the Food In Jars recipe for Garlic Dill Pickles with additional review of similar recipes.  A processing time of 10 minutes was chosen instead of 5 minutes to err on the side of caution against the chard being packed too compactly and making a denser product than cucumber pickles.

Monday, October 9, 2017

Pressure Canning Part II - How It Works

A couple of weeks ago, I did a Pressure Canner 101 post that was helpful in answering a lot of questions posed in the Food In Jars Facebook community, a group of which I'm a member.  There have been a couple more questions about choosing a pressure canner and whether or not to purchase a vintage or used one, so I thought it might be helpful to do a second post.

Pressure Cooker or Pressure Canner?

The question often comes up about what the difference is between a pressure cooker and a pressure canner.  The National Center for Home Food Preservation (NCHFP) has some rather strong thoughts on the matter, but this is the short version:
  • At their core, they operate the same and can have identical features.  They can be made of aluminum or stainless steel, though aluminum tends to be more popular for canners (probably because it's cheaper and lighter when full of jars and water).
  • Some (not all) canners contain a pressure dial that indicates the pressure in pounds per square inch (psi) inside the pot.  Cookers generally do not.  This allows for more flexibility and insurance of accuracy.
  • Only canners that can hold 4 quart jars upright with the lid on have been tested by the NCHFP for proper heat penetration of the food inside the jars.  Since most stove top pressure cookers are 5 quarts or less, they can't be recommended for use as canners, even if their technology is identical.  Also, the time it takes the canner to come up to pressure and go back to normal pressure is considered part of the processing time in tested recipes and that time might be shorter with smaller pots.
  • No electric pressure cookers or multi-cookers have been tested by the NCHFP and as such, they are not recommended, even if the manufacturer claims they are a canner.  The concern is that the size and/or the heating element and electronics might not maintain pressure consistently throughout the processing time.

How do They Work?

As mentioned in my previous post, pressure cookers and canners work under a pretty simple premise.  If you trap steam inside a tightly sealed pot, the steam gains pressure and as the pressure rises, so does the boiling point of water.  In an open pot, water boils (and maxes out) at 212 degrees.  In a pressure cooker at 10psi, it boils (and maxes out) at about 240 degrees.  This means you can achieve much higher temperatures than you ever could in an open boiling water bath.  It's why pressure cooked food cooks faster and also why a pot with a lid on it boils faster (there's a small pressure increase, even under a loose-fitting lid).

Here are the parts of a pressure canner that make it work:

Lock and Gasket

In order to hold steam in, you need some way to lock the pot closed and trap the steam inside.  This is typically done with a lid that twists and locks like the Presto model shown below or a series of crank-down screw clamps like those on an All American canner.

Presto Pressure Canner Lid Lock and Rubber Gasket Seal

All American Canner With Crank-Down Clamps
Routine maintenance of the locking mechanism typically involves replacing the rubber or silicone gasket whenever it becomes cracked, brittle, or starts leaking steam or air during processing.

Steam Vent (aka Petcock or Stem)
The steam vent, also known as a petcock or stem, is like a tiny smoke stack in the lid.  Its job is to vent excess air out of the pot and then serve as part of the system that regulates the pressure inside the pot, letting out just enough steam to keep the pot at the desired pressure (mine clearly needs a good scrubbing).
Steam Vent / Petcock / Stem
Routine maintenance of a steam vent involves keeping it clean and free of crud and debris as well as replacing it if it seems to be corroding or can no longer be cleaned.


Regulator (aka Jiggler)
In most, if not all all pressure canners, the regulator is a metal weight with a hole in the bottom that fits onto the steam vent.  The metal weight is designed to be heavy enough to keep a certain PSI of pressure inside the pot (typically, 15psi).  When the pressure builds such that it will go over the target PSI, the regulator will tilt to the side or spin to allow excess steam to escape.  This constant rocking or spinning and allowing excess steam out keeps the pressure inside the pot where it should be.

An assortment of pressure cooker and canner jiggler-style regulators
Shown above are, from left to right:
  • The original 15psi regulator from my 23 quart Presto pressure canner.  This also fits the 16quart Presto canner.
  • A 15psi regulator from my generic Chinese-made 5 quart pressure cooker.
  • A replacement Presto pressure canner regulator that contains metal rings that let you choose the PSI you wish to maintain.  With both rings, it regulates to 15psi.  With one ring off, it regulates to 10psi, which is suitable for most canning recipes.
  • A 15psi regulator from my grandmother's 1940's Presto pressure cooker
Maintenance on a regulator is almost none, since it's just a weight.  Keep the hole clean of debris and gunk and try not to lose it in the bottom of the kitchen drawer.  Without it, your pot is useless.

Many modern pressure cookers (not canners) contain other pressure regulating mechanisms that are spring-loaded.  They also might have buttons that allow you to evacuate the pressure quickly for a "quick release" instruction in a recipe.  Quick release is rarely, if ever, used in canning so it's an unnecessary feature on a canner.

Pressure Gauge
This is a pressure gauge much like you might see on the heating and system in your home or an automotive air compressor.  Few, if any, pressure cookers come with a gauge since pressure accuracy isn't a high priority in cooking.  However, quite a few canners have them.

Pressure Gauge
If a pressure canner comes with a gauge, it will often come with only a 15psi regulator/jiggler.  This is unfortunate, since the great majority of pressure canning recipes call for 10psi.  This means you will have to stand at the stove and fiddle with the heat until you get the pot to stay around 10psi.  Since the weighted regulator is designed to "jiggle" at 15psi, it will likely hiss but never actually rock back and forth.

On the other hand, pressure needs to be adjusted if you live far enough above sea leavel and a dial gauge with a 15psi weight allows you to make those adjustments.  The NCHFP makes specific recommendations about PSI for certain elevation levels and styles of canners.

If you live at sea level and have a Presto pot, I highly recommend purchasing the three-part weighted regulator, as it buys you extra peace of mind and lets you more easily multi-task in the kitchen as your jars are processing.

As far as maintenance goes, the NCHFP recommends taking your dial off and having it tested professionally at the beginning of each canning season.  If you have an active Cooperative Extension office in your state (often attached to a public university), they can often do it for free or a small fee.

Safety Plug or Valve
Perhaps the most important, yet simplest feature of your pressure cooker or canner is the safety plug.  On canners and simple cookers, this is typically nothing more than a rubber plug in the lid.  Should the steam vent become clogged with food and the pressure rises to unsafe levels, the plug will blow, allowing steam (and food if you're cooking something like stew) upward, away from the cook.  The downside, of course, is that escaping food will get all over the cabinetry, range hood, or ceiling.

Vent Plug and Hole on a Presto Pressure Canner
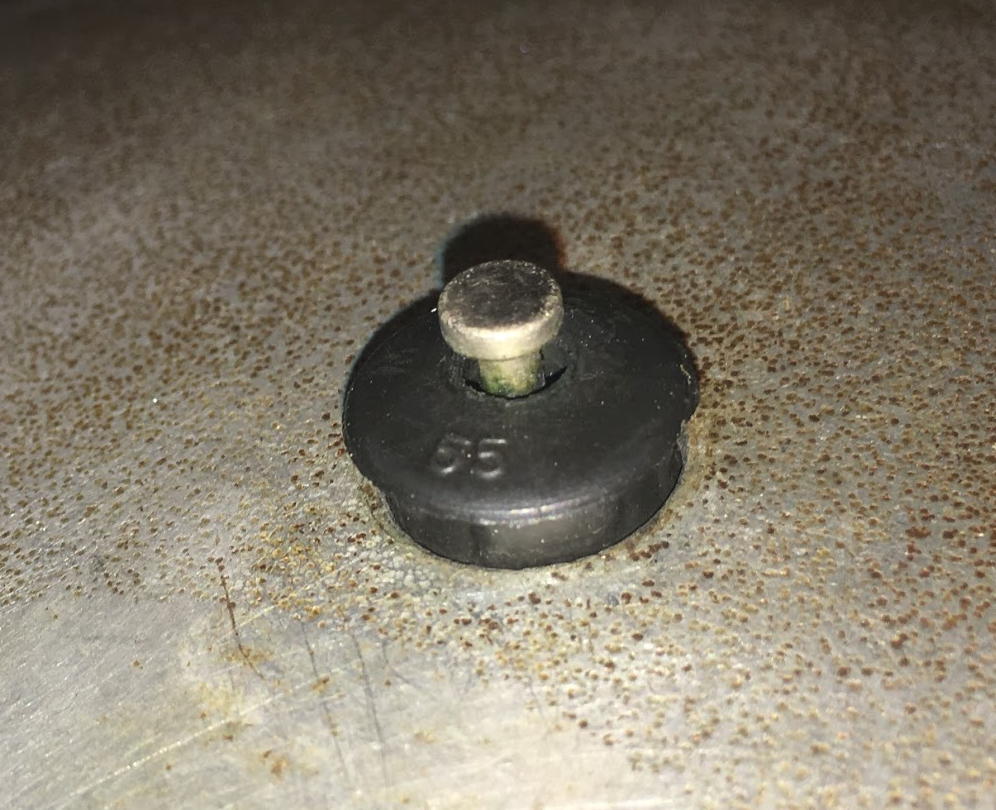
Vent Plug and Pressure Indicator Pin on a 1940's Vintage Presto Cooker
Safety Release Valve on a Generic Chinese-Made Cooker
Notice that the modern and the 1940's vintage pot both use a rubber plug but the generic Chinese-made pot contains a spring-loaded vent valve.  In the event that pressure is too high, the black plastic knob, which is spring-loaded, would rise and vent steam to either side of the valve instead of popping a plug out.  Many modern pressure cookers contain similar safety valves to prevent food from redecorating the kitchen.

Maintenance of the safety plug is as simple as replacing it on a routine basis or when it becomes old, brittle, or appears to leak steam or water.  This is the piece you want in the best working order and since it only costs a few dollars, it's well worth having extras on hand.

Pressure Indicator
The pressure indicator is another optional, yet useful item.  On the Presto pots, it's simply a metal button that will pop-up when there is pressure building in the pot.  This indicates the pot is under pressure and you should not attempt to open it.  When it pops-down (and it makes an audible clank), you know it's safe to open the pot.

Notice above that on my grandmother's 1940's vintage cooker, the pressure indicator is a metal pin in the center of the safety plug.  The pin rises when the pot goes under pressure and the whole plug would blow out should the pot go over safe pressure.

Pressure Indicator Button on a Presto Pressure Canner
Jar Rack
The last and final feature, which I did not photograph, is a thin metal or mesh plate that fits in the bottom of the canner to raise the jars just slightly off the bottom of the pot.  The purpose is to shield the jars from the direct heat of the burner and, more importantly, stop them from bubbling and clanging against the bottom of the pot, which would promote breakage.

What About Vintage or Inexpensive Canners?

Many people are weary of purchasing vintage canners or cookers from consignment stores, thrift stores, etc.  The fact, however, is that this can be an inexpensive way to get into pressure canning and, as long as the pot has been well cared for and is in good repair, it'll work just as well as any new pot you could buy today.

Money doesn't always equate to more safety, either.  The main difference between a Presto pot and an All American pot, aside from a $179 price difference, is the locking mechanism.  Those screw-down clamps may look more imposing and safer, but the fact is that if the pressure is too high, both pots will just blow their safety plugs.

In the course of this post, I've shown you three pots (two cookers and one canner) that I personally own and have used.  Two of them are quite unexpected, but work beautifully:

Vintage WWII-Era Presto Aluminum Pressure Cooker

This was my Grandmother's and I snagged it when she moved into assisted living.  She's maintained it in immaculate condition over the years, right down to the original user manual and handwritten notes about how to obtain replacement parts.  I brought it home and immediately put it into service cooking some corn on the cob and it worked beautifully!

Notice that this pot, which is over 70 years old, has exactly the same features as my 7 year old pressure canner.  The technology hasn't changed!

1940's Vintage Presto Pressure Cooker

Cheap No-Name Brand Chinese Import

I bought this pot from a third-party seller on Amazon for about $25 when I was new to pressure cooking.  When it came in, I found it packaged in a happy meal style box with broken-English labeling on the box, throughout the user manual, and even on permanent safety decals on the cooker itself.

Off-Brand Inexpensive Pressure Cooker

ATTENSIONS: Before cooking, turn the lighten button to fit the ear of the pot vight after feeling it unloose then move it one more and a half ring orso.  (360 degrees for one ring).  When it Will be ready to use it there [...] around the cover.  Please refer to instructions carefully.
As comical as this pot and its instructions are, it has served me over 10 years without failure and is my everyday pressure cooker.  I occasionally have to tighten the screws holding the locking knob and handles on, but I've never had to replace the gasket or any other parts (and likely wouldn't be able to find spare parts, anyway).

Buying a Vintage Pot

If you do choose to buy a vintage or off-brand pot, here are the things to consider and be aware of:
  • Look the pot over and make sure it doesn't have any large dents or cracks.  Scratches are usually part of normal wear and tear.  Black or brown discoloration and mild pepper-like pitting on aluminum is unavoidable, but doesn't damage the pot.
  • Make sure all the components are included or you know you can purchase replacement parts for missing components.  Typically, the loose parts are the regulator, safety plug, and jar rack.  For the All American, a clamp screw could be missing.
  • When you get it home, scrub all the pieces with soap and water.  Replacing the sealing gasket and safety plug is a good idea.  Have the dial gauge tested or purchase a new one.  Most parts are available online, many of them right on Amazon with Prime shipping.  Some old-school hardware stores and independent kitchen supply stores also carry parts in-stock.
  • Read the instructions cover-to-cover and know the features of your pot and how it works.  If it doesn't come with instructions, use Google to locate a user manual online.
  • Fill the canner 1/3 full with water and take it for a test drive with no jars in it.  Make sure it has no obvious leaks and comes up to pressure as expected.  Allow to drop pressure naturally until the pressure indicator (if you have one) shows it is no longer under pressure.

Is it Less Safe Than My Electric Cooker or Insta-Pot?

A lot of people might feel safer with the push-button electric pressure cookers and instapots because the electronics seem to be doing all the work for you.  The fact is, they operate much the same way as a stove-top model and the risks are probably about the same:
  • Electric pots are regulated by spring-loaded valves and electronic pressure sensors instead of jigglers and plugs.  Theoretically, these can break easier and may not even be possible to clean properly or replace.
  • When you close the pot and hit a pre-set button like, "Rice," the pot's computer chip is programmed to know how many minutes of pressure cooking rice needs and takes care of getting the pot up to pressure, counting the cook time, allowing the pressure to drop, then switching to warming mode.  It's convenient, but just as easily done with a kitchen timer on the stove top.
  • Electric pots are just aluminum pans inside a housing with a tight-fitting lid that are powered by an electric coil, similar to a hot plate or slow cooker.
  • As mentioned above, the NCHFP does not recommend electric multi-cookers as canners because they have not been tested and it's unclear whether they would maintain proper temperature for the proper amount of time or whether the pressure-up and cool-down cycle would be too short for tested recipes.
 That's it!  I hope this post helped you.  Happy Canning!

Thursday, September 14, 2017

Pressure Canning 101

Corn Chowder (un-thickened) and Tomato Soup
I've mentioned that I recently became a member of the Food In Jars Facebook Community.  Food In Jars (and its author, Marisa) is one of the best and most comprehensive resources for beginning and advanced canners aside from Ball and The National Center for Home Food Preservation (the USDA-sanctioned organization for canning safety in the US).  If you're looking to get into canning, I highly recommend Marisa's first book, Food In Jars.

One of the questions that has come-up on the Facebook Community over-and-over is, "How do I get into pressure canning?"  As an experienced pressure canner (and pressure cooker), I'm usually the one to pipe-in with an answer.  This post is an expansion on my usual response and I hope it's helpful to everyone.


Is It Safe?

Everyone has heard tales of Grandma's pressure cooker "exploding" and sending food up all over the ceiling. Combine that with the idea of broken glass jars and people are naturally scared.  The truth is that there's very little to be scared about.  All pressure cookers and canners--even ones built during WWII--have safety devices that prevent actual explosions and it's nearly impossible to open a pot under full pressure.  What Grandma probably experienced was the backup device, a pressure relief plug (essentially, a rubber cork) doing its job.  The unfortunate side effect is that the contents of the pot comes streaming upwards.  While it's thankfully projecting away from your face and body, it does redecorate the ceiling.

If you're still worried, consider this fact.  The rubber tires on most cars are inflated to about 35psi (pounds per square inch).  Pressure canners are made of metal and operate at 10 to 15psi.  That means your tires are under more than double the pressure and made out of a much more likely material to puncture.  You've more of a chance of your tire bursting and causing a traffic accident than you have of a pressure canner exploding.

The important part is to know your canner.  Read all the instructions.  Know how all the features work.  Keep it clean and in good repair.  Do all that and you'll have no problems.

Quarts of Homemade Chicken Broth


How Does It Work?


Pressure canners and cookers work under a pretty basic principle.  You have a large pot with a tight-fitting lid with a locking mechanism and a silicone or rubber gasket to trap steam inside.  The steam builds-up, increasing the pressure inside the pot.  When pressure increases, so does the boiling point of water.  At a pressure of 10psi, water boils at about 240 degrees instead of the usual 212 degrees.  This higher temperature is enough to kill botulism spores, which produce a nerve toxin that can be fatal (212 is not).

Vegetable Soup
The second component of your pot is a pressure regulator (often called a jiggler).  The regulator sits atop a straw-like pipe in the lid of the pot (called a stem).  When the pressure goes over a certain psi, the regulator will tilt slightly and let some of the steam out.  This gentle back-and-forth rocking motion allows just enough steam out to keep the pot at the desired pressure (usually, 10psi for canning and 15psi for cooking...more on that later).  Some pressure cookers have spring-loaded regulators instead of jigglers but most pots specifically designed to be a "canner" have an old-fashioned, tried-and-true jiggler.

The last component of your pot is a safety relief valve.  There are any number of designs for this, but the most simple and common is a basic rubber plug in a hole in the top of your pot.  Should the stem become clogged during cooking and the pressure were to rise above safe levels, the plug would shoot out of the hole and release steam (and food or water) to relieve pressure.


Okay, so Which Canner Should I Buy?

The Cadillac of all pressure canners is widely known to be the All-American.  It's an imposing-looking device with crank-down clamps that make people feel safer.  However, it has a hefty price tag at close to $250.  If you're looking to get into pressure canning without committing your kid's college fund, the Presto 16qt Pressure Canner is a great alternative.  At $71, it's much more affordable and I've seen them regularly for $15-20 less at Walmart and on Walmart.com, especially during the end of canning season.  That said, I have two additional recommendations:

#1 - Buy yourself this replacement 2-part regulator for the Presto canner.  Most canning recipes call for 10psi and the pot ships with a 15psi jiggler.  This means you need to regulate the pressure by watching the gauge and tinkering with the stove dial to adjust the heat throughout processing.  The three-part jiggler allows you to take one ring off the weight and it will keep your pot at a constant 10psi, even if the heat is a little too high.  It's great insurance, especially if you're working with an electric stove.

#2 - I don't recommend the 23qt pot unless you know you're going to be doing full two-layer batches of jars at least 95% of the time you can.  And keep in mind, you can only fit one layer of quarts and a 2nd layer of pints or two layers of pints.  When you do smaller batches in the bigger pot, you have to fill the empty space with steam before the pot comes up to pressure, which means a much longer time spent processing.  A 16qt pot is perfect for most people.  And, it's smaller and easier to store.

Can I Use A Pressure Cooker, Instant Pot, or Electric Pressure Cooker as a Canner?

In short, no.  The NCHFP's official word on the matter is, "The USDA recommends that a canner be large enough to hold at least 4 quart jars to be considered a pressure canner for the USDA published processes."

Why?
It appears there are two major concerns.  First, their recipes were only tested with these larger pots and the general rule of thumb with the NCHFP is, "If we haven't tested it, it's not recommended. Period"  Secondly, larger pots have more volume inside the pot and thus, will take longer to cool-down and release pressure than smaller pots.  Since the cool-down time is usually counted as part of the processing time for the recipe, a smaller pot cannot be trusted to process for the right amount of time.

What About Electric Pots?
As for electric pressure cookers, the message is almost the same.  There's a concern about size and the fact that no electric pressure cookers or canners have been tested by NCHFP.  Additionally, the sensors and mechanisms by which these devices detect and maintain pressure are unknown.  You would think that an electronic pressure sensor would be used and would be more accurate, but it's not clear that those are consistently used.  I've personally seen my own Instant Pot report that it had achieved pressure and start counting when it actually hadn't.  My hope is that one day, Ball will develop and test a pressure version of their FreshTech pot.  Until then, we're out of luck in this arena.

But The Manufacturer Says It's a Canner...
This is a real problem.  You can claim anything on your packaging and website, but it doesn't mean the device has been lab tested to work in accordance with NCHFP-approved recipes.

Two manufacturers in particular stand out.  One is Instant Pot.  They're a Canadian company and couple of their pots do claim to be pressure canners.  However, when questioned by U.S. canning experts, they've since walked their stance back and put in a disclaimer.

The other is Fagor, which is an extremely reputable pressure cooker company (and one of the only ones that readily works on an induction cooktop).  They sell one or more pots that are large enough to fit 4 quart jars (per NCHFP instructions) and even include pressure canning recipes on their U.S. website.  However, they appear to use a spring-loaded pressure regulator that only regulates at 15psi, which is far above the 10psi most tested recipes call for.  This wouldn't be unsafe, but will process your food at a higher temperature and unnecessarily overcook it.  Also, NCHFP's guidelines and testing only apply to weighted regulators or those with accurate pressure gauges.  So the bottom line is, use the Fagor pots at your own risk.  They probably work but are untested and will overcook your food.

How Do I Get Started?

With a tested recipe, of course!  You can find recipes and how-to's on the NCHFP website and the Ball FreshPreserving.com website.  As far as books go, I recommend the Ball Complete Book of Home Preserving as a starter.  The last chapter is dedicated to Pressure Canning recipes and covers all your basics (tomatoes, soups, stews, broths, etc.).  Another good resource that's sadly out of print is The Joy of Cooking All About Canning and Preserving.  If you can find yourself a used copy, grab it.  It's a great book.

Homemade Marinara Sauce

Can I Pressure-Can My Own Recipes?

This is probably the most common question.  The NCHFP and Master Canners everywhere usually strongly discourage this.  A common answer is, "No.  Absolutely not!  Always use a tested recipe from a trusted source."  That's excellent advice, and new canners are wise to follow it.  However, when it comes to pressure canning, even the NCHFP is a little more relaxed on the subject.  They've published a small set of guidelines for canning your own soups (Hats-off to Benita from the FIJ community for pointing me to this reference).  Also, I'm going to let you in on an unofficial secret...

If you flip-through the tested recipes in the Ball Complete Book, you'll notice that the processing times fall into a few basic camps (with some exceptions):
  • Recipes with meat or meat broth in them or very varied ingredients, such as soups and stews (~75-90 minutes).
  • Vegetable-based soups with a variety of vegetables (55-85 minutes).
  • Recipes with a single vegetable like green beans (~20-25 minutes)
  • Broth (20-25 minutes)
The specific ingredients are mostly irrelevant within each category because it's the high-temperature that's killing and warding-off the bacteria and spores, not acidity (as with Boiling Water Bath canning).  As long as you don't produce a product that's substantially more dense than the original, you can borrow processing times from a similar tested recipe and apply it to your home recipes with a fairly low safety risk.

Disclaimer - Let me stress...it's up to YOU to decide what level of risk you can live with for you and your family and it's good practice to always tell someone you've shared a jar with if you've deviated from NCHFP safety practices and tested recipes.  Botulism is serious stuff...it's a nerve toxin that can kill you and it's colorless, odorless, and thrives in low-acid oxygen-free environments (like the inside of a canning jar).  I feel comfortable with the above recommendations for me and my family.  You need to make the same call.

With that said, here's my general rule of thumb for adapting recipes:
  • Whenever possible, start with a tested recipe and modify it slightly.  You'll always be safer this way.
  • If you really want to can something that you can't find a tested recipe for, find the closest tested recipe.  For example, beef stew in place of your homemade chicken stew.  Borrow the processing times from that recipe and try not to alter the ratios of ingredients (meats, veggies, liquid) so much that you affect the density of the finished product.
  • Stay away from the usual "no-no" list of ingredients for canning, including: flour, corn starch, pasta, rice, dairy, and large amounts of oil or butter (a little bit to saute onions is fine).
  • Don't try to can puree'd pumpkin or winter squash.  NCHFP has determined the density to be too inconsistent to recommend processing times, even for pressure canning.  The only tested and approved recipe for squash is one from the Ball Complete book for cubed squash in water and frankly, it tastes awful.  I've tried it.
  • If canning tomato products, there's no harm in still adding a little extra lemon juice to acidify the product (in fact, NCHFP recommends it).  Belt AND suspenders.
So that's it.  That's all I have for now.  Go buy yourself that a canner and get canning!

Monday, September 4, 2017

Summer Squash Sweet Pickles

It's been awhile since I've done a canning post.  The truth is, I haven't done a ton of exploratory canning lately.  Last summer, it was all I could do to put-up a couple of batches of a few of our favorite items and that was about it.

This summer has been equally as busy, but three things have contributed to a slightly renewed interest in canning.  First, I've been a member of the Food In Jars Facebook Group, which is doing a monthly "Preserving Challenge" that encourages people to try new preserving techniques.  While I haven't been able to cook and submit something for most months, I've loved being a part of the group, helping out with questions, and watching what everyone else is doing.

Second, I've been participating in a CSA and planted a pretty large garden this year so I'm inundated with produce that we haven't been able to eat fast enough.  That's caused me to do a little bit of preserving all summer.

And third, my parents have been traveling and my Dad loves just about anything pickled, so he's been bringing all kinds of things home and going, "Hey, think you can make this?"


And that's where this recipe was born.  As they were passing through western Kentucky, he picked-up a jar of, "The Hitching Post & Old Country Store Squash Pickles," made with yellow summer squash.  It's a sweet pickle, similar to a bread and butter pickle, which is totally not to my taste, but they seemed fun enough to try to make and I had some yellow squash that needed using-up.  The ingredients label was simple and I was able to use another squash pickle recipe as a base.  Plus, it had the added advantage of being a Low Temperature Pasturization recipe, which was one of the new techniques I'd been wanting to try.  Win-win!

So without further ado, I give you the recipe.

Summer Squash Sweet Pickles

This recipe can be made with either yellow squash or zucchini.  I've provided alternate instructions for traditional boiling water bath canning if you don't want to try the low-temp method.  Also, the turmeric is completely optional.  It's only really there to give them that pretty yellow color.  The crinkle-cut knife is also optional, but isn't it neat?

2 1/2 lbs Yellow Squash, sliced into 1/4-inch slices
1/2 lb yellow, white, or sweet onions, sliced
2 Tablespoons pickling salt
3 cups white vinegar
1 cup water
2 cups sugar
1 Tablespoon mustard seeds
1/2 teaspoon turmeric powder
1/8 teaspoon pickle crisp per jar (optional)

  1. Toss the squash and onions with the salt in a colander and set over a bowl.  Cover with plastic and place in the refrigerator for 2 1/2 to 3 hours.  This will allow some of the moisture to weep out of the squash and leave a less mushy product.
  2.  Blot, but do not rinse the vegetables (you want to keep the salt).  Discard any liquid that drained off.  Select 4 clean pint jars and add 1/8 teaspoon of pickle crisp (if using) to each jar.  Pack each jar with the squash mixture, leaving about an inch of head space.  If you use small-mouth jars, the shoulders will help minimize floating.
  3. In a non-reactive saucepan, combine the vinegar, water, sugar, mustard seeds, turmeric.  Bring just to a boil, remove from heat, and let cool slightly.
  4. Ladle pickle brine into each jar, leaving 1/2-inch head space.
  5. Clean the rims of the jars, add flat lids that have been soaked in warm water, and rings tightened to just finger-tight.
  6. Process using one of the methods below.
Boiling Water Bath
Prepare a water bath canner and process for 10 minutes (processing time taken from a Food In Jars recipe for Pickled Zucchini).

Low-Temperature Pasturization
Fully submerge jars in water that has been heated to 120 to 140 degrees.  Bring water temperature up to between 180 and 185 degrees.  Using an accurate thermometer or an immersion circulator, keep water temperature between 180 and 185 for 30 minutes, adjusting heat as necessary.  Remove jars and allow to cool overnight.  For more information on low-temperature pasturization, see here.  Generally speaking, it is considered safe for most pickle recipes.

Thursday, July 5, 2012

Cookbook Review: Food In Jars

Blogger's Note: This post is long overdue.  I've had a copy of Food In Jars by Marisa McClellan in my possession since the day it was released (thanks to Amazon's fantastic pre-order service) and I was so instantly smitten with it that I spent two nights awake in bed reading it cover-to-cover.  Unfortunately, life just gets away from you sometimes and I haven't taken the time to sit-down and write-up this post until now.

I think every blogger, to some extent or another, has a "blogger crush" on some other blogger.   There's something about that person's work that you just like and that you aspire to achieve in your own work.  Maybe it's a certain "voice" in the writing or a sense of humor.  Maybe you admire the dedication to compose, shoot, and carefully prepare every single photo so that each post comes out just so.  Or maybe you just think, "Gee, if I knew this person in real life, I think we'd be instant friends."

If I were to pick one blogger I admire in this way, it's Marisa McClellan from FoodInJars.com.  Aside from Ball and the NCHFP, Marisa is probably the best and most well-known authority on all things canning.  And get this...she doesn't live on a farm or a homestead or any of the typical places you'd expect to find someone "putting-up" food.  She cans small batches of jams, pickles, chutneys, and just about anything else right in her very small apartment kitchen in Philadelphia.  I also envy Marisa because she's managed to do what I only dream to do...to make a living writing about a topic that she loves and is passionate about.

Enough of the gushing.  Let's talk about the book!  When it arrived, the book was a very pleasant surprise.  A lot of food bloggers have been getting publishing deals lately and I have to admit that some of them fail to impress.  Very often, they're filled with a handful of frilly, impractical recipes and they don't get enough into the meat and potatoes of the topic to be helpful for beginners.  Filled with delicious-sounding recipes and beautiful photos?  Yes.  Fun to look through?  Absolutely.  Constructed to sit open on the countertop amid sticky, wet, and slimy ingredients only to become stained and dog-eared over time from repeated use?  Usually, not the case.

Marisa's book is the complete opposite.  Here are a few reasons why:

Beginner Basics - Always a champion for educating the beginning canner and explaining it as simply as possible, Marisa boils-down the basics of what you need and how to do it into just a few pages, but leaves nothing important out.  I don't think I've ever seen it done in a more concise manner (and I've read quite a few canning books).

Construction - This book is designed as a cookbook, not as a coffee table picture book.  It's just the right dimensions to sit on your kitchen bookshelf and there's no detachable dust jacket.  The pages are sturdy, non-glossy, and once the spine is broken-in a bit, the book will eventualy lie flat (important when your hands are sticky with fruit juice).


Recipes -  This is not a book full of fancy recipes with lots of specialty ingredients.  This is a book with simple, low-yield recipes that just about any home cook can tackle.  Sure, there are some special treats in there, but they don't outnumber the basics that you'd expect to see like a simple peach or vanilla strawberry jam.  There's even a whole chapter devoted to granola!  Most importantly, this is all about small-batch preserving, so most of the recipes don't make more than 3-4 jars at a time and are designed to work with supermarket quantities of produce as opposed to bushels from the farm.

Design & Photos - While this is a serious use-it-in-the-kitchen kind of cookbook in terms of content, the photos are gorgeous and rival that of most coffee table cookbooks and food magazines.  As you're flipping through, your mouth waters and you want to jump up and make every recipe RIGHT NOW (or you wish the pages had free sample packets attached).


Voice - Marisa's voice comes through loud and clear and you'd swear you were reading her blog.  Every recipe has a generous head note that explains where the recipe came from and how she developed it.  Sometimes, they're filled with old family stories while others are more practical.


All and all, I'm going to go out on a limb here and say that you could actually replace The Ball Blue Book (the established Bible for beginners of home canning) with Food In Jars if you really wanted to.  At the same time, this book easily serves as inspiration for those of us who have been at it awhile to get back into the kitchen and try something new.  I highly recommend it to anyone and everyone.

General Info:
Food In Jars - Preserving in Small Batches Year Round
by Marisa McClellan
Published by Running Press (2011)

Disclaimer: I purchased a copy of this book myself.  All thoughts, opinions, and shameless plugs contained in this post are my own and were not solicited by or paid for by the author or publisher.

Monday, January 23, 2012

Thrifty Satisfaction: 10 FREE Quarts of Poultry Stock

I'm an avid canner, but it's been awhile since I've actually had/taken the time to do some serous canning--the kind that saves us time and/or money.  That's partly due to the holidays, partly because we're beyond the bounty of summer, and partly because of the new addition to our family that's kept me quite busy.

Anyway, I finally got a chance to do some canning the other day and I'm pretty proud of the output.  If there's one thing that's worth making and canning around this time of year, it's chicken stock.  Think about it.  All those turkey carcasses are available from Thanksgiving and Christmas (you did remember to toss them into the freezer, right?) and let's not forget all those chickens you've been roasting-up for finger-licking comfort meals (you saved those bones too, right?).

Anyway, even though I didn't actually do a lot of cooking myself during the holidays, I somehow found myself with two turkey carcasses and a chicken carcass taking up space in my freezer.  What can I say?  My family loves me enough to give me their old bones and skin.

On a recent Sunday morning, I tossed all the frozen poultry bones I could find into my humongous 96-quart pressure canner along with some celery, onions, garlic, and carrots, and bay leaves.  I topped it off with water, lidded it up and set it on the stove.  After about 35-40 minutes to come to pressure (that's a LOT of cold water to heat) and another 45 minutes of cooking, I had freshly made chicken stock.  No need to simmer all day when you have a pressure cooker.  I then poured the majority of it into quart jars, lidded them with Tattler reusable lids, popped them back into the canner, and processed them for 25 minutes at 10 pounds of pressure.

The result was 7 beautiful jars of homemade stock and another 3 quarts in the freezer:


By my calculations, this equates to roughly $30-35 worth of store-bought stock that cost me absolutely nothing other than time and a little electricity to make.  I didn't even waste metal flat lids on the jars!  We'll definitely have no shortage of homemade soup and gravy for the rest of the winter.  Yum!

Tuesday, October 4, 2011

What to do with a Glut of Green Tomatoes

Last week, my father called me...

"I've got something for you," he said.

"Oh really?  What's that?"

"A HUGE box of green tomatoes from a friend at work," he replied.

"Oh, so you mean you've got something for YOU," I said with a chuckle.  "You want Piccalilli."

While I tend to let my tomatoes continue ripening on the vine until the first frost (especially this year, as they've been slower than normal to ripen), many people give up once the cool weather comes and yank the vines out of the ground, leaving piles upon piles of unripe green tomatoes and they have no idea what to do with them (other than the veritable "fried green tomatoes").  We made two things with those tomatoes: Dill Pickles and Piccalilli.

I didn't realize it until I tasted the finished batch, but green tomato dill pickles are quite good.  In fact, if I closed my eyes, I'd swear I was eating a cucumber dill that was slightly softer in texture (though not unappealingly so).  We followed Marisa's recipe over at Food In Jars, substituting quartered tomatoes for the cukes.  The great part about this recipe is that you don't have to get into canning to turn-out great pickles.  They pickle just fine stashed in the fridge.

The other thing we made is an old family recipe called Piccalilli.  As best as I can tell, this is one of those canning recipes that varies widely depending on the region, ethnic background, or family recipe.  Generally speaking, it's a relish or a chutney, most often made out of green tomatoes.  However, the add-ins and exact spices are what make each recipe unique.  See what Wikipedia has to say on the subject (altho that mustard piccalilli in the photo is a bit scary).

Our recipe for Piccalilli comes from my paternal grandmother and I'm not quite sure where she got the original.  It came to me, as most old recipes do, with imprecise measurements (a quart of this, a half-bushel of that, 3 small onions, a pint of something, and 2-3 cups of sugar to taste).  After making it twice, I think I've actually worked out more exact measurements so we can get a consistent product from year to year.

Chances are, if you like the taste of hot dog relish or bread and butter pickles, you'll probably like Piccalilli.  I'm on the fence, personally...I really make it more for my father and grandmothers (and his friend at work who gave him the tomatoes).  You could use it in a variety of ways.  One of my grandmothers loves it as a small side dish like you might serve applesauce or beets.  It'd probably taste just fine in a sandwich or in place of relish on a hot dog.  I think it'd be pretty tasty warmed and served as a sauce over chicken or fish like you might do with a chutney.

In any event, I'd love to share the recipe for it here with you today.  If you don't want to can it, a small batch will keep pretty well in the fridge.  Just cook it a little longer and make sure to scald your jars and lids in boiling water so it'll keep as long as possible.


Memere's Piccalilli


Notes: All volume measurements are taken after chopping.  The recipe can be halved or otherwise scaled as necessary.  We make it with coarsely chopped chunks of tomato.  If you want a less-chunky end-product that's more like relish, use a food processor to chop the ingredients but don't puree them.

3 quarts (12 cups) coarsely chopped green tomatoes
4 cups finely chopped green bell peppers
3 cups finely chopped onions (sweet onions taste best)
2 cups white or cider vinegar
1 1/2 cups white sugar
1/2 cup salt (pickling or kosher salt is best)
1 teaspoon cinnamon
1 teaspoon ground cloves

1) Prepare all vegetables and mix together in an extra-large bowl.

2) Toss vegetables with salt.  Cover and let stand at least 2 hours or overnight.

3) Pour-off/strain the water that exuded from the vegetables during the salting process.

4) Add the sugar, cinnamon, cloves, and vinegar.  Stir well to combine.

5) Place mixture in a large non-reactive pot and cook over medium heat until the tomatoes are soft.

6) Fill jars, remove air, wipe the rims and lid them up.  Process in a boiling water bath canner for 10 minutes.  If you've never canned before, be sure to consult a good canning book such as the Ball Blue Book to learn the basic process and safety practices.

7) Alternatively, Piccalilli will store well in sterilized glass jars in the refrigerator for a few months.  Sterilizing the jars (either by boiling or using the sterilize function on your dishwasher) helps keep initial bacteria out of the jar so they will last longer.  Note that even if they seal, they are not shelf-stable unless canned in a boiling water bath.

Wednesday, September 14, 2011

Roasted Tomato Soup

I could have sworn I posted my recipe for roasted tomato soup last year but after searching, it looks like I never quite got around to it.  Since that's yet another thing that came out of that infamous 3/4 bushel of tomatoes, I thought I'd take the time to post the recipe.

Ingredients:
- Enough quartered tomatoes to fill 1-2 half sheet pans (one layer each)
- Handful of fresh basil
- 1 sweet onion, roughly chopped
- 2 ribs celery, roughly chopped
- 1/2 cup of sugar
- olive oil
- salt & pepper

Place all vegetables and basil on a pan and toss with a little olive oil.  If you're planning to can this soup, don't go crazy with the oil as it can cause the jars to go rancid in the pantry and it's not recommended by the National Center for Home Food Preservation.  Season liberally with salt and pepper and half the sugar.  Toss to coat evenly.


Roast in a 300 degree oven until the tomatoes start to shrivel and brown and some of the liquid is released and dries-up.  This may take up to 2 hours.  Remove from the oven and allow to cool enough to handle.

Use a food mill to puree everything and strain out the seeds and skins.  Adjust the seasoning and add more sugar as needed.  You're looking for a flavor profile much sweeter than tomato sauce (unless you like eating straight-up tomato sauce with a spoon for lunch).

Serve immediately (with grilled cheese, of course), store in a refrigerator for up to a week, or can using a pressure canner.  You'll want a processing time of 35 minutes at 10psi for up to 16 oz jars.  I like to can them in 8 or 12 oz "jelly jars".  DO NOT can using the boiling water bath method.  The addition of vegetables makes this a low-acid food, which means BWB canning won't guarantee the removal of botulism spores and those suckers are deadly!

Tuesday, September 13, 2011

Canned Roasted Red Peppers

During last weekend's mini farm stand tour, I picked-up about 6 pounds of red peppers for roasting and canning.  The plan was to make this recipe from Chiot's run that was such a success last year.


I can't speak highly enough of this recipe, though I will mention one caveat.  The recipe calls for quite a bit of olive oil.  If you've done any canning, you'll know that oil is a big no-no ingredient.  As best as I can tell, adding oil to a canning recipe isn't going to kill you, but oil doesn't stand-up to high temperatures very well.  It tends to go rancid fast under heat or simply from sitting in a warm pantry for too long.  When I made these last year, the jars I opened early were terrific.  The last jar, which I hoarded jealously till late in the winter, turned-out rancid and sadly, had to be tossed.


Anyway, the moral of the story is that these won't keep very long.  I suggest keeping them in as cool dark place as you can find in your home--maybe even in a second fridge if you have one.  I have plans to attempt this recipe without the oil at some point but didn't want to risk it with this year's smaller batch.  We had a not-so-great growing season for red peppers this year and I just didn't have the extra to muck with and risk losing.

Monday, September 12, 2011

Marianted "Sun Dried" Tomatoes

Last year, I purchased an inexpensive dehydrator online to try my hand at a new preserving method.  My first attempts at it were a little clumsy and it was nearing the end of the season, so the glut of fresh produce had passed.  The device has been sitting in our storage area since then.

As I was perusing stashed recipes from other bloggers last weekend to find ways I wanted to use my 3/4 bushel of tomatoes, I ran across this one for marinated Sun Dried Tomatoes and knew immediately that I had to give it a try.


I have to say that so far, I'm pretty happy with the results.  They're way tastier than store-bought Sun Dried tomatoes and I think they're going to be a delicious burst of summer flavor in the dead of winter when I start adding them to pasta dishes or make sun dried tomato ravioli with them.  Mmmm..

Some thoughts and tips:
  • If you're buying tomatoes for this recipe as opposed to growing your own, don't expect them to be easier on your wallet than store-bought ones.  The 5 pounds of sliced tomatoes I started with dried down to just 3/4 of a quart canning jar.  Depending on the price per pound, it's only a small cost savings.  You can probably increase your yield by using "paste tomato" varieties, which start with less water.  I happened to have slicing tomatoes on hand.
  • This particular recipe isn't a "pantry staple" as it has a lot of oil in it.  You can store them in the pantry but beware that the oil may go rancid on you and spoil the whole batch.  I've got mine in the freezer.  The fridge would be another good choice if you have the space.  They'd probably be excellent vacuum packed with a FoodSaver like device.
  • Slice the tomatoes on the thicker side (no less than half an inch).  I made the mistake of slicing thinly last year and I ended-up with tomato chips rather than leathery sun dried tomatoes.
  • Time to dehydrate varies quite widely and there's a fine line between beautiful dried fruit and over-dried cardboard.  Hard as it may be, try to plan your drying so that you're home during the last 3rd of the estimated time so you can check them frequently and remove pieces that dried faster than the others.
  • The recipe includes rough instructions for drying via oven.  It's definitely an option if you don't have a dehydrator but you may not like the electricity or gas bill.  Two or three drying sessions might justify the cost of a dehydrator.

Sunday, September 11, 2011

Tomato Jam....Oh My!

I know I promised that separate posts about last week's weekend of canning would be forthcoming, but then the week got away from me as they sometimes do.  So without further ado, Tomato Jam.


This recipe is my new favorite kitchen trick, plain and simple.  It's rare that an uncommon, old-fashiony (I'm declaring that a word...) preserving recipe tickles my fancy quite like this one has as they usually involve pickling something strange or combining sweet and savory ingredients in such a way that it tastes like something Grandma's generation would have eaten out of necessity and thrift, rather than preference.  I'm hapy that this recipe was an exception.  Thanks to Marisa over at Food In Jars for posting it and thank you to her friend for giving it to her.

You'll find the recipe itself here.

What do I love about this recipe?  For one, its simplicity.  You take about 5 pounds of tomatoes, chop them up roughly (I whirred them in the food processor), chuck them into a heavy pot with a bunch of sugar and a few fairly other common household ingredients, and boil it down till it turns to jam.  That's pretty  much it.  If you don't want to can it, it'll survive in the fridge in very clean, tightly sealed glass containers for quite awhile.

The other thing I like about this recipe is that this isn't your PB&J kind of jam.  This is the kind of jam you'd welcome on savory foods and it wouldn't seem out of place.  The taste and consistency is similar to store-bought ketchup without the vinegary punch.  In fact, the first thing we tried with it, as you can see in the photo above, is frozen french fries.  Yeah...I know.  We're classy folk.

Some thoughts and tips:
  • If I were to recommend just two specialized pieces of equipment for making traditional "boiled-down" jam of any kind (you know I don't usually do that), it'd be to have a meat or candy thermometer on-hand and to invest a few bucks in a splatter screen.  Getting boiling syrupy liquid up to 220 degrees (above the boiling point of water) tends to splatter it over everything within 4 feet of the pot, including walls, the floor, your arms, and your clothing.  If you turn the flame down, it'll never get there.  Simple laws of physics.
  • I didn't have any fresh ginger on-hand so I used some leftover candied ginger from another jam recipe.  It worked quite well.  Had I not had that, I would have dipped into a jar of powdered ginger as long as it was relatively fresh.  Ginger tends to lose its potency much faster than other dried spices.
  • I didn't use anywhere near the recommended amount of chili flakes--just a dash.  That's a personal preference, though I imagine a spicier version of the jam is a whole other experience if you like that sort of thing.
  • I like a few less seeds in my tomato products so, as is my custom, I cut each tomato in half across its equator and used my finger to force the bulk of the seed pockets and gel-like liquid out.  I then proceeded with chopping and cooking.  This again, is a personal preference.  If you happen to be using very liquidy tomatoes (like beefsteaks), this can also help them cook-down faster.

Wednesday, September 7, 2011

The Great Tomato Race

As mentioned in a previous post, we spent quite a bit of money at the farm stands this past weekend on some fantastic produce, namely red peppers and a whole mess of tomatoes.  To be fair, that was about 3/4 of a bushel of tomatoes...not a full bushel as I posted earlier.  It seems I can't do math very well.  :-)  The source was two "peck" baskets that were over-full and two pecks equals a HALF bushel.  Since they were over-full, we'll call it 3/4.  Okay, that clears that up.  Move along...

So what came out of that 3/4 bushel of tomatoes and the red peppers?  Glad you asked!
  • 4 quarts of crushed tomatoes in their own juice
  • 5 1/2 pints of Tomato Jam
  • 5 3/4 pints of Roasted Tomato Soup
  • 3/4 quart of Marinated "Sun Dried" Tomatoes
  • 3 1/2 pints of Roasted Red Peppers
Sounds yummy, yes?   Unfortunately, I'm going to make you wait for individual blog entries to get the recipes for the soup and the jam, as they're so tasty they deserve their very own space.  Sorry!

In the mean time, enjoy a lovely photo of some of the output...

Friday, April 15, 2011

Canned Meat Recipes (Posted to share)

A discussion recently popped-up on the Food In Jars Facebook page about canning your own meat.  However, the recipe involved would never pass muster with the USDA because it involved a boiling water bath canning method.  I happened to have a book with some tested recipes for canning meat (the right way) so I'm posting them here to share with the discussion participants.  If this isn't your thing, carry-on.  :-)

Chicken (Bones Removed)
Steam or boil chicken until about 2/3 done.  Remove skin and bones.  Pack hot chicken into hot jars, leaving 1 inch headspace.  Add 1/2 teaspoon salt to each pint, 1 teaspoon to each quart if desired.  Ladle hot cooking liquid, water, or chicken broth over chicken, leaving 1 inch headspace.  Remove air bubbles.  Adjust two-piece caps.  Process pints 1 hour and 15 minutes, quarts 1 hour 30 minutes at 10psi in a pressure canner.

Chicken On-The-Bone
Raw Pack - Separate chicken at the joints.  Pack chicken into hot jars, leaving 1-inch headspace.  Add salt (1/2 tsp pints, 1 tsp quarts) if desired.  Do not add liquid.  Adjust caps.  Process pints 1:05, quarts 1:15 at 10psi.

Hot Pack - Boil, steam, or bake chicken until 2/3 done.  Separate at joints.  Pack hot chicken into hot jars, leaving 1 inch headspace.  Add salt (1/2 tsp pints, 1 tsp quarts) if desired.  Ladle hot cooking liquid, water, or broth over chicken leaving 1 inch headspace.  Remove bubbles and cap.  Process pints 1:05, quarts 1:15 at 10psi.

Stew Meat
use beef or other meat suitable for stewing.  Cut into 11/2 to 2 inch cubes.  Remove fat and gristle.  Simmer meat in water to cover until hot throughout.  Add 1/2 teaspoon salt to each pint, 1 teaspoon salt per quart if desired.  Pack hot meat into hot jars with 1-inch head space.  Ladle hot cooking liquid over meat, leaving 1 inch headspace.  De-bubble and cap.  Process pints 1:15, quarts 1:30 at 10psi.

Chopped Meat
Put meat through a food chopper and measure.  Cook meat in hot skillet until seared.  Stir in 1 to 11/2 cups boiling water, broth, or tomato juice.   Add 1 teaspoon salt per quart if desired.  Pack hot meat and liquid into hot jars, leaving 1 inch headspace.  De-bubble and cap.  Process pints 1:15 and quarts 1:30 at 10psi.  To serve, use for meat loaf, baked hash, or stuffing vegetables.

All recipes come from a 1995 copy of the Ball Blue Book (which was published AFTER the most recent canning rules updates regarding acid/non-acid foods).  I've paraphrased slightly and used abbreviations to make the typing easier.

There are also recipes for roast, spare ribs, steaks & chops, pork tenderloin, pork sausage, and wild rabbit and squirrel (I'm not joking).  There are recipes for clams, tuna, crab meat, shrimp, and smelts.  If you'd like me to add any of these, just comment below and ask.

Monday, January 31, 2011

Reusable Canning Lids - Part 1

One of the reasons I got into canning was to make my own "convenience foods."  I love being able to make my own soups, canned pasta sauces, and other things that can be stored in the pantry and be ready to pop-open and reheat or cook with at a moment's notice.  All the convenience of supermarket-bought items with no defrosting time, way better taste, and I know what went into it and where it came from.  One of the things I don't like, however, is the wasteful non-reusable lids.  My local recycling center will not accept them in the metals bin and it's just not worth the risk of botulism to attempt to reuse them.

In any event, I've been meaning to order some Tattler Reusable Lids for awhile now after a positive review from Marisa over at Food In Jars.  Apparently, these plastic and rubber alternatives to the traditional metal lids used to be on the market years ago and became scarce for awhile.  With the sudden resurgence in canning and the worries over BPA, they've come back.

My order just got here today and I'm almost giddy with excitement to give them a try on a batch of soup or something that'll be staying here (at 50 cents a lid, I don't want them going much further than immediate family, who dutifully return my jars).  I'll be sure to post my thoughts about working with them as soon as I can.  In the mean time, here are my initial thoughts:

  • PRO - They're made in the USA.  Very few plastic items can make that claim these days.
  • PRO - They're reusable...need I say more?  Now, when I can a batch of soup and my wife and I plow most of the jars in a week, I won't feel so bad about how little time the lids spent actually holding the jars closed before they end-up in the Central Landfill (or how much of a dent they made in my wallet).
  • PRO - The price per lid is reasonable at about 50 cents (if I did the math right).  That's roughly double the price of the metal lids.  If the rubber rings hold-up through multiple uses, they'll pay for themselves quickly.
  • CON - Currently, the only place to buy the lids is on Tattler's own website, which I'd label just shy of, "Hello, 1990 called and they would like their website back."  KitchenKrafts has them but at 3 times the price--a rather stiff markup, don't you think?  Perhaps Tattler could get with the 21st century and offer them on Amazon or something?
  • CON - Tattler only offers them for sale in packs of 3-dozen, even though they actually ship in 1-dozen packages.  If you just want one box to try them out, tough luck.  You're in for an investment.  On top of that, their cheapest shipping option is USPS Priority Mail Flat-rate (minimum of about $10).
  • PRO/CON - They offer bulk packaging with a discount.  However, the bulk packs are 500 or 1000 lids--numbers very few canners I know would invest in upfront.  That's a lot of jars to go with that many lids (by my calculations, a $6,000-$10,000 worth of jars).  Wonder if they've had any takers?
  • Potential CON - They're white...and every plastic item I've ever had that's white and gets exposed to heat and tomato products stains.  I guess we'll see if these little guys follow suit or not.  I'll reserve judgment until then.
Stay tuned for Part 2!