A couple of weeks ago, I did a
Pressure Canner 101 post that was helpful in answering a lot of questions posed in the
Food In Jars Facebook community, a group of which I'm a member. There have been a couple more questions about choosing a pressure canner and whether or not to purchase a vintage or used one, so I thought it might be helpful to do a second post.
Pressure Cooker or Pressure Canner?
The question often comes up about what the difference is between a pressure cooker and a pressure canner. The National Center for Home Food Preservation (NCHFP) has some rather strong thoughts on the matter, but this is the short version:
- At their core, they operate the same and can have identical features. They can be made of aluminum or stainless steel, though aluminum tends to be more popular for canners (probably because it's cheaper and lighter when full of jars and water).
- Some (not all) canners contain a pressure dial that indicates the pressure in pounds per square inch (psi) inside the pot. Cookers generally do not. This allows for more flexibility and insurance of accuracy.
- Only canners that can hold 4 quart jars upright with the lid on have been tested by the NCHFP for proper heat penetration of the food inside the jars. Since most stove top pressure cookers are 5 quarts or less, they can't be recommended for use as canners, even if their technology is identical. Also, the time it takes the canner to come up to pressure and go back to normal pressure is considered part of the processing time in tested recipes and that time might be shorter with smaller pots.
- No electric pressure cookers or multi-cookers have been tested by the NCHFP and as such, they are not recommended, even if the manufacturer claims they are a canner. The concern is that the size and/or the heating element and electronics might not maintain pressure consistently throughout the processing time.
How do They Work?
As mentioned in my previous post, pressure cookers and canners work under a pretty simple premise. If you trap steam inside a tightly sealed pot, the steam gains pressure and as the pressure rises, so does the boiling point of water. In an open pot, water boils (and maxes out) at 212 degrees. In a pressure cooker at 10psi, it boils (and maxes out) at about 240 degrees. This means you can achieve much higher temperatures than you ever could in an open boiling water bath. It's why pressure cooked food cooks faster and also why a pot with a lid on it boils faster (there's a small pressure increase, even under a loose-fitting lid).
Here are the parts of a pressure canner that make it work:
Lock and Gasket
In order to hold steam in, you need some way to lock the pot closed and trap the steam inside. This is typically done with a lid that twists and locks like the Presto model shown below or a series of crank-down screw clamps like those on an All American canner.
 |
| Presto Pressure Canner Lid Lock and Rubber Gasket Seal |
 |
| All American Canner With Crank-Down Clamps |
Routine maintenance of the locking mechanism typically involves replacing the rubber or silicone gasket whenever it becomes cracked, brittle, or starts leaking steam or air during processing.
Steam Vent (aka Petcock or Stem)
The steam vent, also known as a petcock or stem, is like a tiny smoke stack in the lid. Its job is to vent excess air out of the pot and then serve as part of the system that regulates the pressure inside the pot, letting out just enough steam to keep the pot at the desired pressure (mine clearly needs a good scrubbing).
 |
| Steam Vent / Petcock / Stem |
Routine maintenance of a steam vent involves keeping it clean and free of crud and debris as well as replacing it if it seems to be corroding or can no longer be cleaned.
Regulator (aka Jiggler)
In most, if not all all pressure canners, the regulator is a metal weight with a hole in the bottom that fits onto the steam vent. The metal weight is designed to be heavy enough to keep a certain PSI of pressure inside the pot (typically, 15psi). When the pressure builds such that it will go over the target PSI, the regulator will tilt to the side or spin to allow excess steam to escape. This constant rocking or spinning and allowing excess steam out keeps the pressure inside the pot where it should be.
 |
| An assortment of pressure cooker and canner jiggler-style regulators |
Shown above are, from left to right:
- The original 15psi regulator from my 23 quart Presto pressure canner. This also fits the 16quart Presto canner.
- A 15psi regulator from my generic Chinese-made 5 quart pressure cooker.
- A replacement Presto pressure canner regulator that contains metal rings that let you choose the PSI you wish to maintain. With both rings, it regulates to 15psi. With one ring off, it regulates to 10psi, which is suitable for most canning recipes.
- A 15psi regulator from my grandmother's 1940's Presto pressure cooker
Maintenance on a regulator is almost none, since it's just a weight. Keep the hole clean of debris and gunk and try not to lose it in the bottom of the kitchen drawer. Without it, your pot is useless.
Many modern pressure cookers (not canners) contain other pressure regulating mechanisms that are spring-loaded. They also might have buttons that allow you to evacuate the pressure quickly for a "quick release" instruction in a recipe. Quick release is rarely, if ever, used in canning so it's an unnecessary feature on a canner.
Pressure Gauge
This is a pressure gauge much like you might see on the heating and system in your home or an automotive air compressor. Few, if any, pressure cookers come with a gauge since pressure accuracy isn't a high priority in cooking. However, quite a few canners have them.
 |
| Pressure Gauge |
If a pressure canner comes with a gauge, it will often come with only a 15psi regulator/jiggler. This is unfortunate, since the great majority of pressure canning recipes call for 10psi. This means you will have to stand at the stove and fiddle with the heat until you get the pot to stay around 10psi. Since the weighted regulator is designed to "jiggle" at 15psi, it will likely hiss but never actually rock back and forth.
On the other hand, pressure needs to be adjusted if you live far enough above sea leavel and a dial gauge with a 15psi weight allows you to make those adjustments. The NCHFP makes
specific recommendations about PSI for certain elevation levels and styles of canners.
If you live at sea level and have a Presto pot, I highly recommend purchasing the
three-part weighted regulator, as it buys you extra peace of mind and lets you more easily multi-task in the kitchen as your jars are processing.
As far as maintenance goes, the NCHFP recommends taking your dial off and having it tested professionally at the beginning of each canning season. If you have an active Cooperative Extension office in your state (often attached to a public university), they can often do it for free or a small fee.
Safety Plug or Valve
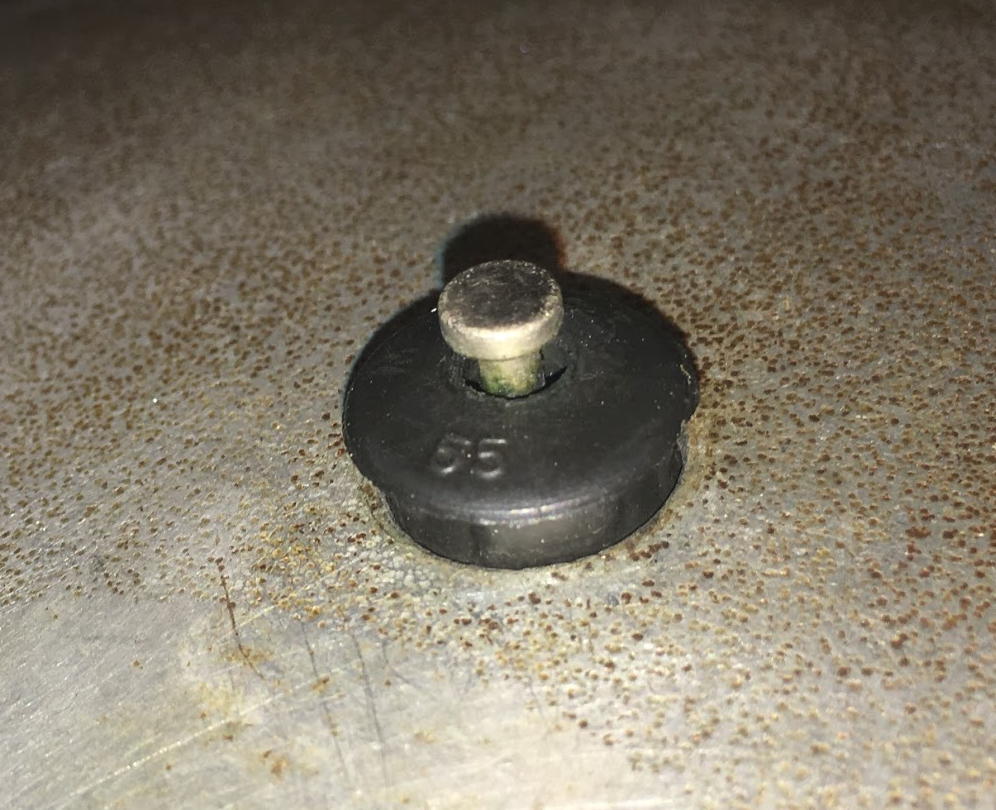
Perhaps the most important, yet simplest feature of your pressure cooker or canner is the safety plug. On canners and simple cookers, this is typically nothing more than a rubber plug in the lid. Should the steam vent become clogged with food and the pressure rises to unsafe levels, the plug will blow, allowing steam (and food if you're cooking something like stew) upward, away from the cook. The downside, of course, is that escaping food will get all over the cabinetry, range hood, or ceiling.
 |
| Vent Plug and Hole on a Presto Pressure Canner |
 |
| Vent Plug and Pressure Indicator Pin on a 1940's Vintage Presto Cooker |
 |
| Safety Release Valve on a Generic Chinese-Made Cooker |
Notice that the modern and the 1940's vintage pot both use a rubber plug but the generic Chinese-made pot contains a spring-loaded vent valve. In the event that pressure is too high, the black plastic knob, which is spring-loaded, would rise and vent steam to either side of the valve instead of popping a plug out. Many modern pressure cookers contain similar safety valves to prevent food from redecorating the kitchen.
Maintenance of the safety plug is as simple as replacing it on a routine basis or when it becomes old, brittle, or appears to leak steam or water. This is the piece you want in the best working order and since it only costs a few dollars, it's well worth having extras on hand.
Pressure Indicator
The pressure indicator is another optional, yet useful item. On the Presto pots, it's simply a metal button that will pop-up when there is pressure building in the pot. This indicates the pot is under pressure and you should not attempt to open it. When it pops-down (and it makes an audible clank), you know it's safe to open the pot.
Notice above that on my grandmother's 1940's vintage cooker, the pressure indicator is a metal pin in the center of the safety plug. The pin rises when the pot goes under pressure and the whole plug would blow out should the pot go over safe pressure.
 |
| Pressure Indicator Button on a Presto Pressure Canner |
Jar Rack
The last and final feature, which I did not photograph, is a thin metal or mesh plate that fits in the bottom of the canner to raise the jars just slightly off the bottom of the pot. The purpose is to shield the jars from the direct heat of the burner and, more importantly, stop them from bubbling and clanging against the bottom of the pot, which would promote breakage.
What About Vintage or Inexpensive Canners?
Many people are weary of purchasing vintage canners or cookers from consignment stores, thrift stores, etc. The fact, however, is that this can be an inexpensive way to get into pressure canning and, as long as the pot has been well cared for and is in good repair, it'll work just as well as any new pot you could buy today.
Money doesn't always equate to more safety, either. The main difference between a Presto pot and an All American pot, aside from a $179 price difference, is the locking mechanism. Those screw-down clamps may look more imposing and safer, but the fact is that if the pressure is too high, both pots will just blow their safety plugs.
In the course of this post, I've shown you three pots (two cookers and one canner) that I personally own and have used. Two of them are quite unexpected, but work beautifully:
Vintage WWII-Era Presto Aluminum Pressure Cooker
This was my Grandmother's and I snagged it when she moved into assisted living. She's maintained it in immaculate condition over the years, right down to the original user manual and handwritten notes about how to obtain replacement parts. I brought it home and immediately put it into service cooking some corn on the cob and it worked beautifully!
Notice that this pot, which is over 70 years old, has
exactly the same features as my 7 year old pressure canner. The technology hasn't changed!
 |
| 1940's Vintage Presto Pressure Cooker |
Cheap No-Name Brand Chinese Import
I bought this pot from a third-party seller on Amazon for about $25 when I was new to pressure cooking. When it came in, I found it packaged in a happy meal style box with broken-English labeling on the box, throughout the user manual, and even on permanent safety decals on the cooker itself.
 |
| Off-Brand Inexpensive Pressure Cooker |
 |
| ATTENSIONS: Before cooking, turn the lighten button to fit the ear of the pot vight after feeling it unloose then move it one more and a half ring orso. (360 degrees for one ring). When it Will be ready to use it there [...] around the cover. Please refer to instructions carefully. |
As comical as this pot and its instructions are, it has served me over 10 years without failure and is my everyday pressure cooker. I occasionally have to tighten the screws holding the locking knob and handles on, but I've never had to replace the gasket or any other parts (and likely wouldn't be able to find spare parts, anyway).
Buying a Vintage Pot
If you do choose to buy a vintage or off-brand pot, here are the things to consider and be aware of:
- Look the pot over and make sure it doesn't have any large dents or cracks. Scratches are usually part of normal wear and tear. Black or brown discoloration and mild pepper-like pitting on aluminum is unavoidable, but doesn't damage the pot.
- Make sure all the components are included or you know you can purchase replacement parts for missing components. Typically, the loose parts are the regulator, safety plug, and jar rack. For the All American, a clamp screw could be missing.
- When you get it home, scrub all the pieces with soap and water. Replacing the sealing gasket and safety plug is a good idea. Have the dial gauge tested or purchase a new one. Most parts are available online, many of them right on Amazon with Prime shipping. Some old-school hardware stores and independent kitchen supply stores also carry parts in-stock.
- Read the instructions cover-to-cover and know the features of your pot and how it works. If it doesn't come with instructions, use Google to locate a user manual online.
- Fill the canner 1/3 full with water and take it for a test drive with no jars in it. Make sure it has no obvious leaks and comes up to pressure as expected. Allow to drop pressure naturally until the pressure indicator (if you have one) shows it is no longer under pressure.
Is it Less Safe Than My Electric Cooker or Insta-Pot?
A lot of people might feel safer with the push-button electric pressure cookers and instapots because the electronics seem to be doing all the work for you. The fact is, they operate much the same way as a stove-top model and the risks are probably about the same:
- Electric pots are regulated by spring-loaded valves and electronic pressure sensors instead of jigglers and plugs. Theoretically, these can break easier and may not even be possible to clean properly or replace.
- When you close the pot and hit a pre-set button like, "Rice," the pot's computer chip is programmed to know how many minutes of pressure cooking rice needs and takes care of getting the pot up to pressure, counting the cook time, allowing the pressure to drop, then switching to warming mode. It's convenient, but just as easily done with a kitchen timer on the stove top.
- Electric pots are just aluminum pans inside a housing with a tight-fitting lid that are powered by an electric coil, similar to a hot plate or slow cooker.
- As mentioned above, the NCHFP does not recommend electric multi-cookers as canners because they have not been tested and it's unclear whether they would maintain proper temperature for the proper amount of time or whether the pressure-up and cool-down cycle would be too short for tested recipes.
That's it! I hope this post helped you. Happy Canning!




 Posts
Posts

